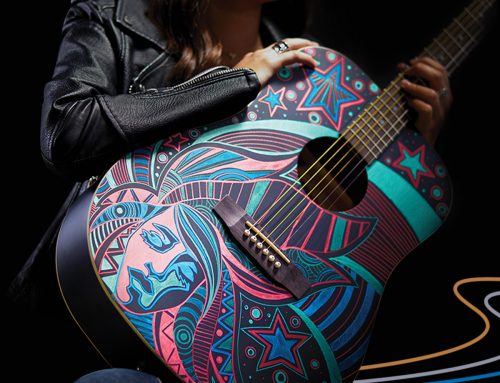
Express Yourself Through Fashion
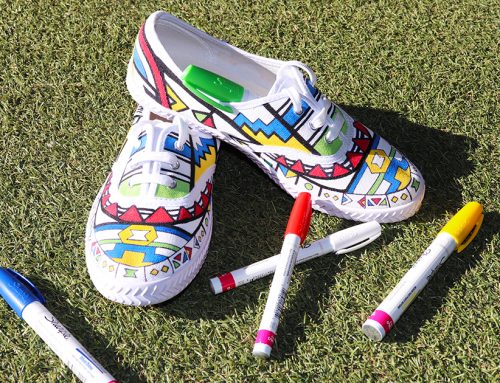
CANVAS SHOES
YOU’RE A BORN ORIGINAL AND BOLD INDIVIDUAL with a style and edge all your own. So you’ve meticulously cultivated your fashion sense to stand out from the crowd, not blend in. Rather than sport the same look as the general public, you prefer to make a personal statement that’s uniquely, undeniably, unmistakably yours.
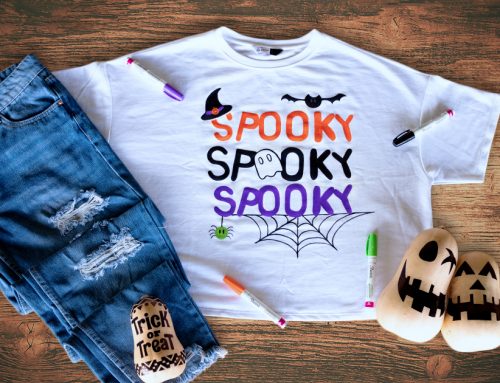
YOU DON’T HAVE TO BE A PROFESSIONAL DESIGNER TO MAKE A PERSONAL STATEMENT THROUGH FASHION. All it takes is some basic items, a little creativity, and a fresh set of Sharpie markers. And in our new How-To series, “EXPRESS YOURSELF THROUGH FASHION,” we’ll show you how in just a few quick and easy steps.
CUSTOMISE YOUR CANVAS KICKS Canvas sneakers never go out of style. Whether it’s Chuck Taylors, Vans or Keds, this casual and comfortable footwear is a go-to look that goes great with almost any outfit. So fittingly, there’s no better canvas for creating personalized design creations than classic white canvas slip-ons or tie-ups.

YOU’LL NEED:
A fresh pair of bright white canvas sneakers
Stained by Sharpie™
- Rubbing alcohol
- Eye-dropper
White acrylic paint (optional)
STEP 1: PRACTICE ON PAPER FIRST to perfect your personalised design before applying it to your new sneaks.
STEP 2: PICK A DESIGN THAT’S TOTALLY YOU. Choose a design that fits your individual style and that you’ll want to wear often. For example, play with fun ideas like:
- INTRICATE DESIGNS: Explore interlocking shapes, circular swirls, or floral patterns.
- SHOW OFF YOUR FANDOM: Incorporate your favourite fashion, band, or sports team logos; your school crest or mascot; song lyrics; or themes and characters from the latest popular TV show you’re streaming.
- GO GALACTIC: Create out-of-this-world space scenes mixed with stars, planets, and far-off galaxies.
- CLASSIC TIE-DYE: For another far-out look, create classic tie-dye patterns that are a snap to recreate with Sharpie markers. (Bonus: no messy dye or clean-up required)
STEP 3: OUTLINE YOUR DESIGN. Transfer your paper sketches to your canvas sneaks using a pencil. Pencil lines are neatly erased from the canvas if you make a mistake. And if light smudges are leftover, don’t worry, your Sharpie markers will cover them up.
STEP 4: COLOUR IT IN. You’re now ready to make your design pop in bold, brilliant colors using your Stained by Sharpie™ markers.
- For shapes, borders and words you wish to stand out, retrace your pencil outlines using black Sharpie Fine Tipor Medium Tip markers. Trace over two to three times to add greater weight (thickness) for extra boldness.
- Next, uncap a panorama of eye-popping colors using Red, Green, Purple, Blue, Turquoise, Pink, Yellow, and other Stained by Sharpie™ hues to bring your design to life in living colour.
STEP 5: BLEND IT TOGETHER. If you desire a blended-in effect in your design, use rubbing alcohol to subtly swirl your Sharpie colours together. Using an eyedropper, simply add several drops of alcohol to the areas you want to blend, then let soak in and watch the colours spread and mingle. The more drops you add, the greater the blurring effect will be. Allow drying when done.
DONE! You can officially join all the other kids with the pumped up kicks with your own one-of-kind creations sure to kick up tons of compliments from your friends.
Check back to this section often for our next EXPRESS YOURSELF THROUGH FASHION edition. And be sure to send us your own ideas too!